Creative Chaos

Tuesday, December 29, 2009

De-decking the halls

This post is what's gotten me all excited about me new project that I'm starting in a couple days. Check back so you can join in the fun. In the mean time, read on. While De-decking (is that a word?!?!) this year, let's start thinking about next year. I know you're thinking, are you serious?!?! But think about it. Once October gets here, the days blur and Christmas is here before we know it and you're behind on everything you wanted to do. So let's do a little planning now so we don't get too behind.

The first problem I encounter is Christmas decorations. Yes, I admit it, I probably have too many. I do purge them every now and then, but I think each year I just like to "mix it up" a little. Because we got rid of our living room, I also no longer have room to display it all. So I spent hours this year looking through bins trying to find the decorations that I wanted to bring down from the attic. Well, never again!

I've tried many different things to label my Christmas bins-masking tape that I've written on, packing tape, writing on the box itself (when I didn't have plastic bins), label maker, on and on. They each have their problems. First, masking tape and packing tape melt in the attic. It makes a mess of my plastic bin if I need to relabel as the glue has melted permanently onto the bin. Boxes? Well, if you move enough like me, your boxes are covered in writings and I don't know which is current and which is from five moves back. And they get damaged by water or crushed, etc. Label maker? Good for some things, but my labels for some reason don't like to stick to my plastic bins. And the label stickers are kind of expensive if you're doing a lot.

So, here are some tips of mine-

#1-invest in plastic tubs with lids that snap on. Clear ones will let you see what's in them, but I didn't buy those when I first started (and I'm not sure they come in different sizes) I think it's a good thing to stick with one brand (though you can have them in different sizes) so the lids are interchangeable and they stack nicely. I have rubbermaid, I believe. They come in several different sizes, but the lids are interchangeable. So I don't have to waste time figuring out what lid goes on which container  (you'll see why I really believe in this in just a minute). They hold up great, are water proof (if the water isn't above their lid), and most of my packers have just put a little more packaging supplies in them, but left the contents in the container so I don't have to repack them when we move.

#2-label your boxes! This is what I have done:

Christmas 2009 027

I have made a universal Christmas tag that I can easily mark off what's in the box, and it's eraseable! Why go to the effort you may say? Well, each year I don't pack the same decorations in the same tub. Let's think about this. If I have a tub full of ornaments, and then we purchase more the next year, what do we do? I could get a second tub for new ornaments, or I could find a larger tub for all of them (but I'd have to remove the label from the smaller tub and make new label for larger tub). Well, because I can interchange lids, it's easy to move all the ornaments to a larger bin (to keep them all together!) and keep my tag marked "ornaments" on the lid. If I add something else to the box, I just check it off on my tag too. (Wow, I'm learning very quickly how hard of a time I have explaining simple concepts on this blog-so bear with me.)

Now, if you go up in my attic, you will see stacks of bins (along the walls) and see a tag hanging from each one, marked with the contents. So come next December, I can easily pull down the ones I want. And then I can easily repack it all back up and if I need to store stuff in different bins, no problem. One little erase of a marker and a new mark and I'm set for next year.

If you want to do this, this is what you'll need:

Cardstock (regular paper will work but it will be a little flimsy)

Hole punch

Ribbon (find something cheap in your craft box that you're not going to use)

Scissors

Drill with drill bit (I think I used around 3/16")

Laminator with laminating sheets

Tag (email me if you want me to send you a word document with mine-I couldn't figure out how to post here)

White board marker


1. Print your tags out (I have two to a sheet)

2. I like to cut mine out first, then laminate, then trim excess film off. Then punch hole in top.

3. I drilled a hole in the end of each of my lids. Just make sure you're far enough from the edge. If you're not steady enough to do this while holding the lid, grab a piece of wood (or something that you don't mind have drill holes in), and stand the lid up on the board and drill from the inside of the lid, out.

4. Cut your ribbon and tie tag on. Then thread ribbon through hole and tie. 

5. Mark contents of bin.


It really is easy and doesn't take too much time. I think I designed the tag, laminated and marked everything in less than an hour. I think I'm going to take this principle and make a new tag that lists all the holidays. This way, I can check off "Halloween", or "Valentine's Day" and not worry about my label machine labels sticking or having to change them if I add new decorations and have to switch bins. So easy!

Another thing I did was to gather up all of our Christmas books (that we use for the 12 days of Christmas) and I went ahead and spent 5 minutes and wrapped them all. I packed them in a bin so they are all ready to go when I start decorating next year! This will make it so you're more likely to do the tradition-trust me! If you have to find time in December to find your books, and wrap them, you're not going to do it.

Next, look around your house and see if you kept any envelopes from the Christmas cards that you received. I made a stack so I'd have any addresses that I needed for my Christmas list. This also tells me who I got a Christmas card from (so I keep them on my list) and who I can take off my list (because I didn't get a card). Yes, friends do move during the year, but if you gather what you have now, it will save you time. I think a great way to organize addresses is in Word-with mailing labels. This way you can easily print them out next year on labels, and then just put regular paper in the machine and print them out so you have all your addresses on a couple sheets of paper that you can put in your birthday card box (read more about this in the next couple days). ***Just make sure you save your labels and back it up somewhere*** I have put all the time into typing it into my computer, and then crashed my harddrive without a backup-ARGH! So backup your file on a disk, USB stick, external harddrive, or online.

Last, buy any Christmas supplies that you need while they are on clearance. Wrapping paper, tags, tins. I hit the dollar stores and purchase their tins at 1/2 off ($.50-can't beat that!) for my Christmas goodies. If you have room to store the supplies, it's worth it. Buy those candy canes and other candies for your gingerbread houses-it doesn't go bad! Store it with your decorating supplies so you know where it is when it's time to decorate next year. And if you aren't into making cards, the price is right to grab some now. I grab a box to use for neighbors, ward friends, and co-workers.


Friday, December 25, 2009

Day 1-Christmas

Our rule is that the kids can come down and open their stockings, and see what Santa has brought, but they can't unwrap anything unless the parents are awake and downstairs. In the past, we have actually had to wake them up so they haven't beaten us downstairs.

Their stockings usually have a small gift, then some candy, or a can of soda, and an orange or so. Nothing big. If they need PJs, we might do that too. Gordon gets to stuff my stocking and I get to stuff his.

Santa has a tradition in our house of leaving notes. One Christmas he scolded the kids for leaving their magnetic toys on the floor and Santa almost slipped on them. It's so funny because the note from Santa is one of the few things that Jarrett remembers. So I have to make sure that I do that again. I already know what it's going to say. I've tried everything I can think of to get my boys to sleep in their room. Nothing has worked. So right now Jarrett is on an air mattress at the foot of our bed and Kaden is on our couch next to the bed. That may sound bad to you, but they were in our bed up until a couple months ago. So the last thing I can think of is to break down and buy them a tv (which is what Jarrett says is the reason why he's in my room), and move it into their room. It will actually work out ok because we're rearranging things and getting rid of our toy room (that's a whole other post). So Santa is going to write a nice note telling the boys that they have to sleep in their room to keep the tv, and only watch good shows. If they don't obey, Santa will return in February to remove the tv!

My sister gets on my case for telling my kids about a make believe man, but I tell you what-he's been good for us. The boys make sure not to leave their toys out on Christmas eve. And I really think this might just work if Santa threatens them-ROFL. It should be interesting if nothing else.

And as far as Santa goes, when our boys ask us if he's real, I just turn the question back on them and say, "Do you think he is?" So far, they say, "yes". So I then say, "Well, I guess he is then".

For dinner on Christmas, we eat pizza! I purchase Papa Murphy's the day before and just keep in the fridge. Nice and easy-no mess. Spending time with family is what matters most!

Thursday, December 24, 2009

Day 2-Christmas Eve

We celebrate Christmas Eve by starting with our Christmas dinner. This way I don't have to be cooking on Christmas when the kids want help with games and toys, and there isn't a mess left for me to clean up either. After dinner is cleaned up, we open our last book (we try to make it the Nephite Christmas story) and then after reading the nativity, we open one present-a specific one. We love to play games together so I buy one game that we can play on Christmas eve and that's the gift that we unwrap.

Just before bed, the boys will put out a plate of veggies for Santa and do something for the reindeer. In years past we've sprinkled reindeer food on the grass (oats with glitter) to "light the way" for the reindeer, and we've tossed broccoli on the rooftops. This year I made a reindeer food plate and I think we'll put some veggies on it and set it by Santa's plate. I did design some up for my aunt and made them up for this year, but Santa's plate says "cookies" so I'm not sure what Jarrett will say to that. He knows that Santa loves veggies!

Christmas 2009 017

We really try to have all the gifts wrapped weeks in advance so we're not scrambling on Christmas Eve. I will have to put together a hot wheels bike, though, this year as I didn't have any place to stash it put together. In fact, the boys found it stashed in my closet so I had to fib and say the wrapped present was for someone else!

We try to give the boys three gifts from parents (like the Wise Men), and then one unwrapped gift from Santa. Our gifts I put under the tree as soon as I wrap them so our tree isn't bear and I don't have to worry about the kids finding them stashed. Jarrett asks every night if he can sort them into "who's is who", but I've told him "no" and he's been ok with that. It's nice to finally have old enough kids that I don't have to worry about them getting into the gifts beforehand.

Wednesday, December 23, 2009

Day 3-Christmas Jar

This is one of my favorite traditions. It's based on the book, "Christmas Jars" by Jason Wright. The basic idea is that you take a jar and sit it somewhere where you will see it often. Then, each day you fill the jar with your change. When Christmas comes, you find a family that is in need, and anonymously give them the jar.

We have our jar sitting on our kitchen counter. My mom made us our jar for a Christmas a couple years ago. We've decided not to give the original jar, but we transfer the money to another jar or gift card so we can keep this one for sentimental reasons.

It's not exactly easy to fill the jar  each day because of debit cards these days, so we have to make an effort to remember to use as much cash as possible. The kids have fun filling it up and they know what it's for. So it's a family effort! It's allowed us the opportunity to help out family and friends over the past years and it reminds us year round that giving is more important than receiving. IMG_0800


Tuesday, December 22, 2009

Day 4-Ornaments

Each year, Gordon takes the boys to Hallmark to pick out ornaments. Kaden and Jarrett each get to pick out an ornament for their own Christmas trees. At first, Gordon was really set on the boys getting a "series" (similar ornaments each year until the series was complete). However, the boys don't think ree that way and Gordon quickly learned that he was going to have to let them decide for themselves. Jarrett's tree is mostly covered with trains, an airplane or two and some Tonka construction vehicles. Kaden's tree has airplanes, fire engines, Tonka trucks, and Rocket. I write their name on the bottom of each ornament, the year, and where we are living (ie. Kaden, '09, OH)

Gordon has his own series that he's collecting for his trees. He gets the Star Trek series (I think there are two) and then the lighthouse series.

I'm not really into collecting those kinds of ornaments so I started my own set, picture frames. Probably about 2 or 3 years ago I found some small pictures frames on clearance at K-Mart. I sanded them down and painted them all red. Then I put vinyl lettering on them, each with a different word like "Joy, Believe, Peace" etc. I'm putting our Christmas photo in the frame, and writing on the back the year and location. They are displayed on our family tree.

Christmas 2009 022

When the boys are old enough, and if they ever move out, they will get to take their ornaments with them. 

Monday, December 21, 2009

Day 5-Gingerbread

I think this one is probably our longest running tradition. I made my first gingerbread house the first year we were married. My visiting teacher invited me to her home to decorate a house. I found the whole experience wonderful-especially the smell of real gingerbread, so we started the tradition ourselves.

Each year, we usually invite one or two families over for our annual gingerbread party. We purchase cheese pizzas from Papa Murphy's and let the families put their own toppings on them. After we've eaten our pizzas, we start on the kids' trains or houses. Once the kids are done, then the adults get to do their houses. It's so funny to watch the husbands "take over" the project while the mom's are cleaning up the kids or helping them finish their projects. I've just learned to let Gordon take the lead on our house each year-it's easier that way. "-) The first couple years we tried different gingerbread house patterns, but the past several years we've used the same one. It's cute, simple, and I have the pattern.

This year I decided to have a Cub Scout Gingerbread party. Jarrett really got into decorating. Kaden did it for about 5 minutes-nice and simple and the other boy, Daniel, worked on his for about 30 seconds and then decided he was done and that he'd rather play computer games.

IMG_0789

 IMG_0796

Baking

Here is the recipe I use. As you can see, it makes a lot of dough. I think I can get at least three large houses and a couple trains out of one dough.

Gingerbread House Recipe

2 sticks margarine

1 cup brown sugar

1 1/4 cups molasses

3 eggs

8-9 cups flour

1 TBSP. baking soda

1 tsp. of each of the following: salt, allspice, cinnamon, ground cloves, ground ginger

Cream together margarine and sugar. Add molasses and eggs. Beat until smooth. Add baking soda and spices. Add flour slowly, until just mixed, forming a ball. Wrap in saran wrap and chill for at least 1 hour. Divide dough into manageable portions. Roll out on parchment paper until dough is about 1/8 inch thick. Cut desired shapes. Remove excess. Bake for 10 minutes at 350 degrees. (If not using parchment paper or wax paper, lightly grease pan)

So I made a movie on how to make the houses, roll the dough, bake it, etc. However, I can't figure out how to upload it so I'm going to have to write it out, so here it goes-

Roll your dough on parchment paper-it REALLY makes a difference. You can use wax paper, however the wax burns a little in the oven. When you open the oven door, you'll get a puff of smoke when using wax paper. I use it when I run out of parchment paper, but I definitely prefer the paper.

For my pattern pieces, I have them printed on cardstock and then individually cut out and laminated. I store them in my cookbook so I can easily find them year after year. Each piece tells me what it is and how many I need to cut. That's essential for me as I have two different house patterns and train that has four different cars. By laminating them, it also keeps them from sticking to your dough and getting grease stains.

When cutting out the pieces, use a pizza cutter. It gives you a nice clean edge. Also, make sure you leave enough space between your pieces for them to grow in the oven. Don't try to cut them all close together and then move the pieces-they will lose their shape.

Once you have your pieces cut, remove the excess dough and place the entire parchment on your cookie sheet and bake for 10 minutes. Before placing in the oven, use a water bottle to lightly mist the tops-this will prevent them from raising too much.

Remove them from the oven and let them sit on the cookie sheet for 1-2 minutes and then transfer the entire parchment to a cooling rack. When cool, remove the pieces from the parchment and I then place mine on a new piece of parchment until I'm ready to use. Don't stack the pieces or they may stick together.

It really is worth the time to make the gingerbread instead of using graham crackers. Your house will smell heavenly! I think I cut and baked the three trains in less than an hour (however I do have double ovens so that speeds up the process).

Assembling

To assemble your house, you will need a piece of cardboard that has been covered in aluminum foil. Don't skimp on the size because it's just as fun to decorate the landscape as it is the house itself. You will also need frosting (the cement), piping bags and tips, a moist washcloth (get it wet and ring out excess water), and a couple cans of soup.

I use a medium star tip to begin with. Pipe a generous amount of frosting on the bottom of your first piece and one side. Then use a can of soup on the outside of the house to support the piece while you work on the next one. Continue to assemble the house, making sure that you are securing the house to your board (with the frosting). Use an GENEROUS amount of frosting. You can always cover it up with candy. I use cans of soup to hold my roof on too, while it's drying. I place the soup under the overhangs. Once it's dry, you can decorate. If you're doing a party and you want the party to go smoothly, go ahead and assemble the houses or trains beforehand. I assemble the kids' stuff beforehand definitely.

The key to assembling is to have the right kind of frosting-Royal frosting. This is NOT buttercream. It's pure sugar with no fat. This is the recipe that I always use:

Royal Frosting

3 level TBSP Meringue Powder

4 cups powdered sugar

6 TBSP water

Beat all ingredients at low speed for 7-10 minutes (10-12 minutes at high speed for portable mixer) until the icing forms peaks and it loses it's sheen. Makes 3 cups.

You'll need to double or triple this for one recipe of dough, depending on how much decorating you do. The meringue powder makes it very easy but you can make it without. Here is a recipe in case you don't have any. (The powder is found in the cake decorating aisle at Walmart or craft stores)

Cement Frosting

1 egg white, room temperature

1 1/3 cups powdered sugar

A little less than 1/4 tsp. cream of tartar

Combine and beat for 7-10 minutes until stiff peaks form.


Now, make sure that after you make your frosting that you cover it with a lid or the moist towel. Otherwise it will dry up quickly. I also have several wet washclothes laying around while we decorate so we can cover the decorating tips (attached to the pastry bags) when they are not in use. If your frosting dries, you'll have to use a toothpick to try and clean the tip out.

Once the house or train is assembled and dried, it's time to decorate! There are so many different candies that you can use. I think our staples are red and green M&Ms, peppermints, licorice, cookies, tootsie rolls, gum drops or dots, red hots, candy canes (large and small), coconut (looks like snow), pretzels (makes a great fence), sugar ice cream cones (makes great trees), marshmellow snowmen or trees, etc. I used to hate it because we'd have a ton of candy left over because we'd buy so many varieties, and it would go to waste or my kids would find it and eat it. But I've learned that most of it is pure sugar and it lasts for years. So I just bag it up and put it with my cake decorating supplies and keep it for the next year. I didn't have to buy any candy this year as I had a ton left over from last year!

That's it! It is SO MUCH FUN!!

Here are just a few of the families that we have shared this tradition with, over the years-

 Christmas 2002

December 2005 068

Feb-March 2009 018

Feb-March 2009 020

Feb-March 2009 024

If you want the train patterns (it has one more car than this), you can find it here:

  http://familyfun.go.com/recipes/gingerbread-train-715184/


Sunday, December 20, 2009

Day 6-Scrapbook pages

Most of you have heard me talk about this one before-Scrapbook Memories from my siblings. We started this one several years ago when we finally decided that the family lived in too many locations and it was getting expensive to ship things. So we decided that each family was going to design a scrapbook page that shared their family memories of the year. Then each sibling, my parents, and my grandfather would get a copy.

Some of the families make 8 pages, some make one original and then copy it for everyone. Others make a digital version and email it to the siblings. It doesn't matter the form. I've done it several different ways, depending on the year and what I was in the mood for. The first Christmas we did this, each family received an album to keep them in. I don't know about everyone else, but my album is full and I need to buy another one!

My kids LOVE to look in the album and see their cousins and themselves! I've been really bad at doing my own scrapbooks so this has been great that at least I have a "yearly" page, if nothing else. Instead of writing a Christmas letter to my friends, I copy my page and mail that with our Christmas card. I've received many cards saying how they love to get our page each year. It's so much fun to get each family's page(s).

Saturday, December 19, 2009

Day 7-Family Memories

This will be a new tradition that is started this year. I got the idea in a Relief Society meeting a couple months ago from my friend Karen Brown.

I think it's really fitting because there isn't anything that I really need for Christmas. And I know that budgets are strapped as the years go on, and people's memories are fading also. So this Christmas I asked my parents that for Christmas, I'd like them to give me a written memory. I told them that they could start chronological, or start with their favorite memories about their childhood or mine. It doesn't matter to me, I just want them to share their memories with me. Then each year I'll add the memory to a binder and keep them to share with my kids.

I know there are plenty of memories out there, so I'm excited to get this. My mom grew up in Mexico on a farm with an outhouse so I know the boys will think that's interesting. I remember her talking about a doll that ended up down there, but I don't remember how-so there's a story. And my dad is full of stories that teach principles and repentence! I know my kids will benefit from those when they are teens! Both of my parents do not keep journals (mom did at once but I don't think she has in years) so this is a good way for them to do it.

I'm so excited to get our first page mom-I can't wait!! I hope you still remember this and are planning to do it!

Friday, December 18, 2009

Day 8-"12 Days of Christmas" for our family

We started a tradition several years ago with Christmas books. We wrap 12 Christmas books (one day we'll do it for 24 days) and put them under the tree. Each night, as a family, we unwrap one of the books and read the story before bed. It really helps to set the atmosphere for the season and it's something we get to do as a "family."

So it wasn't a huge expense to start, the first year we purchased one book and then checked out the rest from the library. Each year, we add on by purchasing a new book for our collection. Also, my kids have received books from their grandparents to add to the collection.

Some of the books we have now are:

I Spy Christmas, photographs by Walter Wick

Christmas Oranges, retold by Linda Bethers

A Night without Darkness-A Nephite Christmas story, written by Timothy Robinson

The Spirit of Christmas by Nancy Tillman

The Christmas Sweater by Glenn Beck

Penny's Christmas Jar Miracle by Jason Wright

The Tale of Three Trees retold by Angela Elwell Hunt


Some that have been suggested by friends are:

Snowmen at Night

A Gift for the Christ Child

Polar Express

Gingerbread boy by Jan Brett

The Nutcracker

Mr. Willoughby's Christmas Tree

Thursday, December 17, 2009

Day 9-Baking for our Friends

Another thing I love to do is designate a day for baking for our friends and neighbors. Each year I do it a little differently. Sometimes I just bake one thing, and give them a tin full of that. This year, I thought I'd try some new recipes and see how it goes. I actually had a great time doing it. The only thing I've decided is that I love cooking with others. Maybe one day I'll get to do my holiday baking with family or a close friend! I really planned on taking pictures this year because I thought the tins turned out cute. I cut everything micro size and put the individual pieces in little decorative paper cups (small cupcake foils), and then arranged them in tins. However, by the time I got them all done, I was ready to deliver and totally forgot about pictures. Here are the recipes I did this year (and some pictures from other blogs):

OREO BALLS-The recipe I get asked for most! (Thanks Leigh, for the recipe and idea for this one!)

oreo balls

OREO BALLS

Ingredients:

- 1  Package Oreo cookies, crushed
- 8 ounces cream cheese, softened
- 1 bag chocolate chips, melted or 2 packages dipping chocolate  (white, dark, milk – whichever you prefer!)

Directions:

  1. Crush Oreo cookies in blender or food processer. Add softened cream cheese and mix together (I used my Kitchen aide).
  2. With your hands, roll Oreo and cream cheese mixture into small balls.  Place on baking sheet lined with wax paper.
  3. Chill in freezer for 30 minutes.
  4. Melt chocolate chips or dipping chocolate in the microwave until melted.
  5. Using a toothpick, dip the Oreo balls into the melted chocolate.  Cover well.
  6. Let Oreo balls harden on a wax-paper lined cookie sheet in fridge or freezer. Takes about 15 minutes.
  7. Keep in fridge! Serve cold and enjoy!

Makes about 25 – 40 Oreo Balls, depending on how you make them

You'll probably have left over chocolate so grab some pretzel twists and dip them too. I like to use which chocolate to dip mine in, and then I drizzle some chocolate over the top. YUMMY!


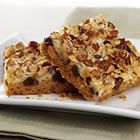
Chocolate Nut Bars

Magic Cookie Bars from EAGLE BRAND(r) Recipe

Chocolate Nut Bars (with optional coconut)

  • 1/2 cup butter or margarine, melted

  • 1 3/4 cups graham cracker crumbs

  • 1 (14 ounce) can EAGLE BRAND® Sweetened Condensed Milk

  • 2 cups semisweet chocolate morsels, divided

  • 1 cup flaked coconut (optional)

  • 1 cup chopped nuts

  • Directions

      1. Preheat over to 375 degrees. Combine graham cracker crumbs and butter. Press into bottom of 9 x 13 baking pan. Bake 8 minutes. Reduce temperature to 350 degrees.
       2. In small saucepan, over low heat, mix milk, 1 cup chocolate chips and vanilla. Pour chocolate mixture over prepared crust. Top with  remaining 1 cup chips, coconut and nuts. Press down firmly.
      3. Bake 25 to 30 minutes or until lightly browned. Cool. Cut into bars or diamonds. Store covered at room temperature.
       
      Brownie Mint Sundae Squares (note, this is a frozen dessert!)

      Ingredients

      • 1 (19.5 ounce) package Pillsbury® Classic Traditional Fudge Brownies
      • 3/4 cup coarsely chopped walnuts
      • 1 (14 ounce) can EAGLE BRAND® Sweetened Condensed Milk
      • 2 teaspoons peppermint extract
      • 5 drops green food coloring (optional)
      • 2 cups whipping cream, whipped
      • 1/2 cup mini chocolate chips


      Directions

      1. Prepare brownie mix as package directs; stir in walnuts. Turn into aluminum-foil lined and greased 13x9-inch baking pan. Bake as directed. Cool thoroughly.
      2. In large bowl, combine sweetened condensed milk, peppermint extract and food coloring (optional). Fold in whipped cream and chocolate chips. Spoon over brownie layer.
      3. Cover; freeze 6 hours or until firm. To serve, lift from pan with foil; cut into squares. Serve with hot fudge sauce (optional). Freeze leftovers.


      Brownie Raspberry Bars

      Brownie raspberry bars 

       Ingredients

      • 1 cup (6 ounces) semi-sweet chocolate chips
      • 1/4 cup margarine or butter
      • 2 cups biscuit baking mix
      • 1 (14-ounce) can Eagle Brand Sweetened Condensed Milk (NOT evaporated milk)
      • 1 egg
      • 1 teaspoon vanilla extract
      • 1 cup chopped nuts
      • 1 (8-ounce) package cream cheese, softened
      • 1/2 cup confectioner's sugar
      • 1/2 cup red raspberry preserves
      • Red food coloring, optional
      • Chocolate Drizzle

      Preparation
        1. Preheat oven to 350°F. In small saucepan, over low heat, melt chips with margarine.
        2. In large mixer bowl, combine melted chips, biscuit mix, sweetened condensed milk, egg and vanilla; mix well. Stir in nuts. Turn into well-greased 15x10-inch baking pan.
        3. Bake 20 minutes or until center is set. Cool thoroughly. In small mixer bowl, beat cream cheese, sugar, preserves and food coloring, if desired, until smooth; spread over brownies. Garnish with Chocolate Drizzle. Chill. Cut into bars. Store covered in refrigerator.
        4. Chocolate Drizzle: Melt 1/2 cup semi-sweet chocolate chips with 1 tablespoon shortening. Immediately drizzle over bars.

    Preparation Time
    15 minutes

    Baking Time
    20 minutes

    Chilling Time
    1 hour

    Serves
    Makes 36 to 48 bars


    Mini Cheesecakes
    Mini Cheesecakes I Recipe
     

    1-1/2 cups HONEY MAID Graham Cracker Crumbs
    1/4 cup  (1/2 stick) butter, melted
    1/2  cup plus 2 TBSP. sugar, divided
    2 pkg.  (8 oz. each) PHILADELPHIA Cream Cheese, softened
    1/2 tsp. vanilla, divided
    1/2 cup  Sour Cream
    2 eggs


    HEAT oven to 325°F.  Mix crumbs, butter and 2 Tbsp. sugar. Place small liners in your small cupcake pans. (or you can do regular size cup cake tins and just cook longer). For the small tins, I used 1 tsp. mixture in each tin and used the back of the teaspoon to press the mixture firmly into tin. 

    BEAT cream cheese, sugar and vanilla in large bowl with mixer until well blended. Add  sour cream; mix well. Add eggs, 1 at a time, beating on low speed after each just until blended. Spoon into tins. (I put the mixture into a pastry bag and then piped it in to make it easier.)

    BAKE 15 min. or until center is almost set. Cool completely. Refrigerate 4 hours. Add strawberry pie filling topping to each cheesecake just prior to serving.


    Fantasy Fudge

    Fantasy_Fudge

    Prep Time:
    10 min
    Total Time:
    25 min
    Makes:
    3 lb. or 40 servings, about two squares each

    What You Need

    3 cups sugar
    3/4 cup  (1-1/2 sticks) butter or margarine
    1 small can (5 oz.) evaporated milk (about 2/3 cup) (Do not use sweetened condensed milk.)
    1-1/2 pkg.  (12 squares) BAKER'S Semi-Sweet Chocolate, chopped
    1 jar (7 oz.) JET-PUFFED Marshmallow Creme
    1 cup  chopped PLANTERS Walnuts
    1 tsp. vanilla

    Make It


    LINE 9-inch square pan with foil, with ends of foil extending over sides of pan; set aside. Place sugar, butter and evaporated milk in large heavy saucepan. Bring to full rolling boil on medium heat, stirring constantly. Boil 4 min. or until candy thermometer reaches 234°F, stirring constantly to prevent scorching. Remove from heat.

    ADD chocolate and marshmallow creme; stir until completely melted. Add walnuts and vanilla; mix well.

    POUR immediately into prepared pan; spread to form even layer in pan. Let stand at room temperature 4 hours or until completely cooled; cut into 1-inch squares. Store in tightly covered container at room temperature.


    I did sugar cookies too, and just cut them really small. I used a medicine cup as my cookie cutter. Frost and add sprinkles and place in paper liner.


    I'd love to hear what you made, and get a recipe for it. I'm going to try out several recipes this next year to see what I want to make next Christmas.


    Wednesday, December 16, 2009

    10 Days of Christmas Traditions....

    So I thought I'd do a sequential post for Christmas this year. I've never done one, and I'm already behind so we'll see if I get through all 8 or not. But I wanted to share some of our Christmas traditions and then hear from you on some of yours. Maybe we'll add a couple more to our list for next year.

    Day 10-Christmas Baking  (for ourselves)

    When I think about baking, I think of my Grandpa and Grandpa Moore. Even though my grandma has passed away, my grandfather has tried to continue this tradition. The three favorites of the Moore family is Norwegian Christmas Bread, Bakalese, and Orange Rolls. I'm not a huge fan of the Christmas Bread because of the dried fruit in it, but the bread part tastes good. The Bakalese is something that has to "grow on you" and the orange rolls are a staple in my kitchen.

    Bakk2

    These are the bakalese. It's a flat bread that has been fried. The interesting ingredient is the cardamom seed. It was fun to make these over Thanksgiving with the entire family, and learn the in's and out's on how to roll the dough, cut the slits and fry them to perfection. Gordon doesn't like the taste so I probably won't be making them anytime soon. However, the boys and I definitely like them and will eat them anytime we have a chance.

    100_0641-1 

    These are orange rolls-my favorite! (And Kaden's too). Kaden is constantly begging me to make these anytime I have oranges around, as it calls for orange peel in the filling. And we try to make these "just like Grandpa." It's pretty funny to watch how each family member makes their own version on them, sometimes substituting different ingredients. We made three different fillings on T-day, trying out each family's recipe, and I have to say that I like the original best. But as Grandpa says, it get them to raise just right, you have to put them in front of the fire. So that's what we do-let the rolls raise by our fireplace and they turn out great! Here's my recipe for them:

    Orange Rolls

    From the kitchen of Grandma Moore

    2 pkgs yeast (4 1/2 tsp.) For the filling:

    1/2 cup warm water   1/2 cup shortening

    1/2 cup sugar 1/2 cup sugar

    1 cup scalded milk 4 orange rinds

    1/2 cup shortening

    2 eggs

    Pinch of salt

    In a saucepan, scald milk. Then add shortening and set aside to cool. In a ceramic bowl, mix yeast, water and sugar. Let sit for 15 minutes. After the 15 minutes, and the milk is cool, combine both mixtures in your Kitchen Aide. Mix. Add eggs and salt. Blend. Add enough flour to make a soft dough (5-6 cups). Cover and let it raise till it's double. Divide dough in half, roll out till it's a little less than 1/4" thick. In a small bowl, combine the ingredients for the filling. Spread half of filling on rolled out dough. Then roll up dough and cut into 1" segments. Place in greased muffin tins. Let them rise again. Bake at 400 degrees for 10 minutes or until golden brown. Makes 2-3 dozen.

    Some family uses butter instead of shortening, and some cut back on the orange rind and use orange juice concentrate. It's up to you...experiment and see what you like best. They are wonderful if you freeze them and then microwave them when ready to eat. I try to freeze a bag each time I make them so I don't eat them all in one day-but the bag is usually cracked open before the week is over!